Releasing a Python App at Github/PyPI and Automate it - 8/9
Releasing a Python app on GitHub and PyPI, then automating the release process with GitHub Actions.
Heya fellows,
This is part 8 of the multi-part series “The Evolution of a Script”. The code of this post can be found on Github (see here).
Contents
- A Simple Script
- Sys Module
- Argparse Module
- Distribution via Installation Script
- Distribution via Setup File
- Testing and Continuous Integration
- Documentation
- Publishing at PyPI
- Publishing at Anaconda
As stated in previous posts our tiny HTTP client can now be downloaded from Github and installed via pip.
$ pip install https://github.com/NiklasTiede/tinyHTTPie/archive/5-Distributing-by-Setup-File.zipBut Python packages are usually installed from the Python Packaging Index (PyPI) with a simple name you can remember like
$ pip install tihttpBut how do we release our project so other can download it conveniently from the Python packaging index? We make sure that our main line is in releasable state and then we
- Tag our project and stick thereby to a versioning scheme
- Release it on Github
- Release it on PyPI
Git Tags and Release at Github
Depending on the kind/size of a project developers use Git branching workflows when working as a team but for smaller projects it’s sufficient to work on the main line and create only branches when introducing features that might affect the stability of the project. This way we keep the main line always in a releasable state.
Then we can then make a new release as we gathered enough fixes/features. Developers pick either semantic versioning or calendar versioning as versioning scheme. We use the former and call our first release v0.1.0. We point to the commit we want to release by tagging it.
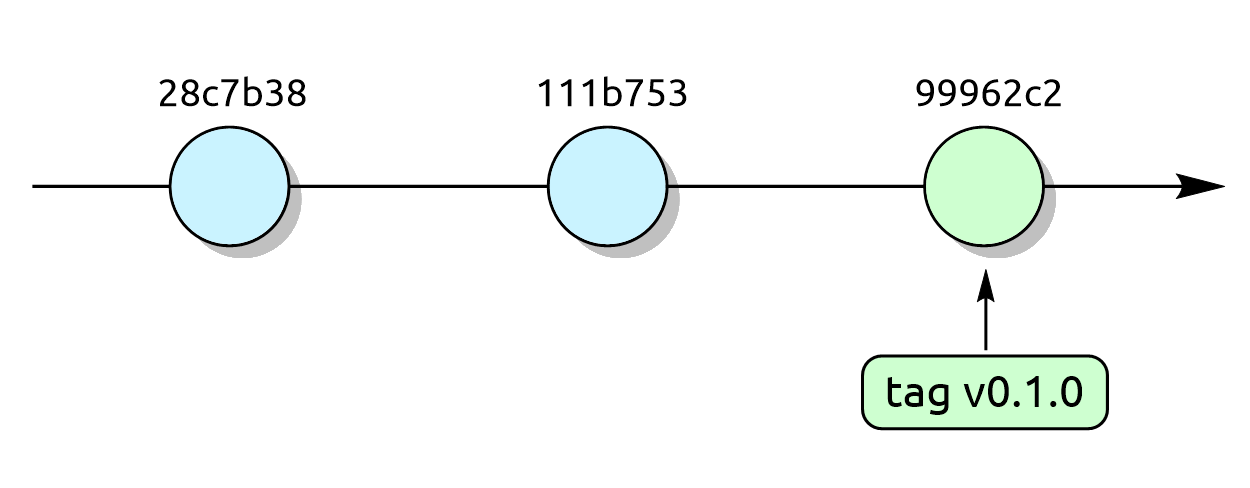
We can use lightweight or annotated tags which contain extra metadata. I like to use lightweight tags. The git tag command tags by default the last commit. We can also tag older commits when specifying the commit ID (example: git tag v1.1.0 c52e686). In this case we will tag the last commit and push it into the remote repo.
$ git tag v0.1.0 # git tag <tagname>
$ git tag # returns a list of all tags
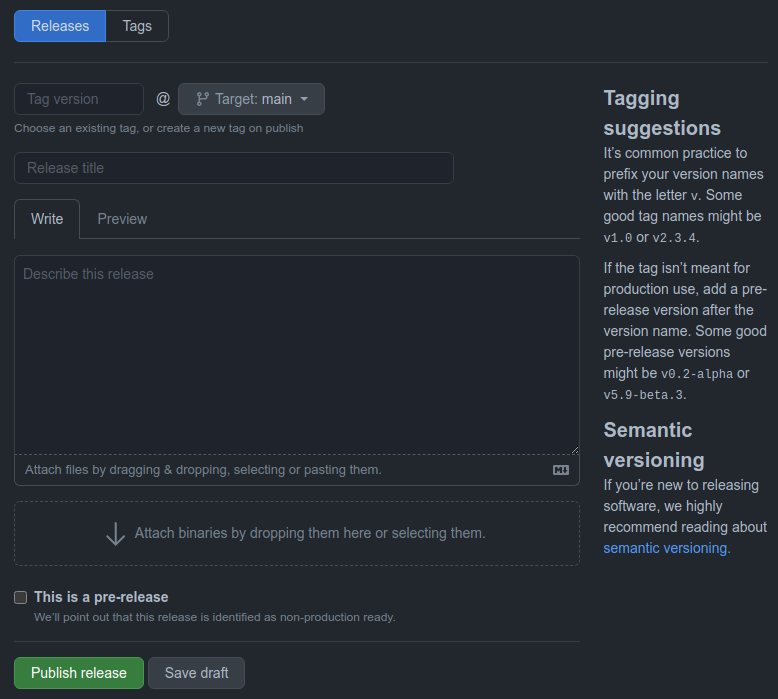
$ git push origin v0.1.0Now we browse our way to the Github repository and create a release. We go to Releases 🠲 Create a new release, and type the tag we wanna release. We can add binaries if we release projects which use compiled languages or write release notes. I like to document the changes of the release in a CHANGELOG.md file.
At last, we publish the release. In the next section we will package our project and publish it at the Python Packaging Index (PyPI).
Publishing at PyPI
To publish a python project at PyPI we have to package it by generating a source distribution (.tar.gz) and a wheel distribution (.whl).
$ pip install wheel

$ python setup.py sdist bdist_wheel
The generated files can be found within the dist directory. Now we have to register at PyPI before we can upload our project. For testing purposes it’s convenient to upload the project to TestPyPI first. So, let’s do that.
$ pip install twine

$ twine upload --repository testpypi dist/*
Now let’s test installing tihttp.
$ pip install -i https://test.pypi.org/pypi/ --extra-index-url https://pypi.org/simple tihttpOur tools works perfectly fine!
$ tihttp -H google.comAnd now that we are sure that everything works, it’s time to upload things to PyPI.
$ twine upload --repository pypi dist/*

$ pip install tihttp
Keep in mind that you can upload a specific semantic version just once to PyPI, thats why it’s important to test uploading the version when just starting out the deployment process for a new project. Otherwise you have to bump the release version up and repeat the process (in that case the world will not end either).
Automated Release with Github Actions
Both processes (Github release and publishing at PyPI) can be automated using Github actions. The automation here is not that powerful for a project of this size but still I REALLY like Github actions and wanna let keep you in mind how nice it is! 😀
The instructions for the workflows are stored as yaml-file within the .github/workflows/ directory of the project. Tags can be automatically released using the github action gh-release.
name: GH Release

on:
  push:
    tags:
      - 'v*.*.*'

jobs:
  github-release:
    runs-on: ubuntu-latest
    steps:
    - uses: actions/checkout@master
    - name: Release
      uses: softprops/action-gh-release@v1
      env:
        GITHUB_TOKEN: ${{ secrets.GITHUB_TOKEN }}
As you can see each major, minor or patch tag increment will create a new release.
At last I wanna show you a more powerful workflow for uploading releases automatically to PyPI.
name: Upload Python Package

on:
  release:
    types: [created]

jobs:
  pypi-release:
    runs-on: ubuntu-latest
    steps:
    - uses: actions/checkout@v2
    - uses: actions/setup-python@v2
    - name: Install dependencies
      run: |
        python -m pip install --upgrade pip
        pip install setuptools wheel twine
    - name: Build and publish
      env:
        TWINE_USERNAME: ${{ secrets.PYPI_USERNAME }}
        TWINE_PASSWORD: ${{ secrets.PYPI_PASSWORD }}
      run: |
        python setup.py sdist bdist_wheel
        twine upload dist/*
To store the credentials open your repository on Github and then go to settings 🠲 secrets 🠲 new repository secret then type in the name (for instance PYPI_USERNAME) and its value.
Ok, I hope this post had some value to you. I wish you all a great day! 🤠